Drupal adalah sistem manajemen konten free, open-source, dan scalable yang dapat digunakan oleh individu untuk membuat dan mengelola segala jenis situs web. Drupal ditulis dalam PHP dan menggunakan MySQL/MariaDB untuk menyimpan datanya.
Drupal menyediakan beragam fitur yang dapat diperluas dengan ribuan add-on. Drupal mendukung banyak server web termasuk, Apache, Nginx, IIS, Lighttpd dan database MySQL, MariaDB, MongoDB, SQLite, PostgreSQL, dan MS SQL server. Drupal hadir dengan UI web sederhana dan ramah pengguna yang memungkinkan Anda membuat situs web tanpa pengetahuan coding.
Dalam tutorial ini, kami akan menunjukkan kepada Anda bagaimana menginstal Drupal 8 pada server CentOS 8 dan mengamankannya dengan SSL gratis Let’s Encrypt.
Persyaratan Tutorial
- Server yang menjalankan CentOS 8.
- Nama domain yang valid ditunjukkan dengan IP server Anda
- Masuk sebagai root atau user dengan hak sudo
Install Nginx, MariaDB and PHP
Pertama, kita install LEMP web server, Linux Nginx dan MariaDB server dan PHP dengan perintah berikut:
dnf install nginx mariadb-server php php-fpm php-cli php-mbstring php-gd php-xml php-curl php-mysqlnd php-pdo php-json php-opcache -y
Setelah semua paket diinstal, mulai layanan Nginx, MariaDB dan PHP-FPM dan aktifkan untuk memulai setelah system reboot dengan perintah berikut:
systemctl start nginx
 systemctl start php-fpm
 systemctl start mariadb
 systemctl enable nginx
 systemctl enable php-fpm
 systemctl enable mariadb
Setelah selesai, Anda dapat melanjutkan ke langkah berikutnya
Konfigurasikan Database MariaDB
Secara default, MariaDB tidak diamankan. Anda dapat mengamankannya dengan skrip berikut:
mysql_secure_installation
Perintah ini akan mengubah kata sandi root, menghapus pengguna anonim, melarang login root dari jarak jauh dan menghapus database pengujian.
Jawab pertanyaan seperti yang ditunjukkan di bawah ini dan pastikan untuk memilih kata sandi yang aman untuk pengguna root:
Enter current password for root (enter for none):
Set root password? [Y/n] Y
New password:
Re-enter new password:
Remove anonymous users? [Y/n] Y
Disallow root login remotely? [Y/n] Y
Remove test database and access to it? [Y/n] Y
Reload privilege tables now? [Y/n] Y
Setelah MariaDB diamankan, masuk ke shell MariaDB dengan perintah berikut:
mysql -u root -p
Berikan kata sandi root Anda, lalu buat database dan user database untuk Drupal dengan perintah berikut:
MariaDB [(none)]> CREATE DATABASE drupaldb CHARACTER SET utf8mb4 COLLATE utf8mb4_general_ci;
 MariaDB [(none)]> CREATE USER drupal@localhost IDENTIFIED BY "g4nt!_d3n9an_p4$$w0rd";
Selanjutnya Grant privileges ke drupaldb dengan perintah berikut :
MariaDB [(none)]> GRANT ALL ON drupaldb.* TO drupal@localhost IDENTIFIED BY "password";
Selanjutnya, flush privilege dan keluar dari shell MariaDB dengan perintah berikut:
MariaDB [(none)]> FLUSH PRIVILEGES;
 MariaDB [(none)]> EXIT;
Download Drupal
Pertama, Anda perlu download Drupal versi terbaru dari situs web resmi dengan perintah wget. Anda dapat mengunduhnya dengan perintah berikut:
wget https://ftp.drupal.org/files/projects/drupal-8.7.10.tar.gz
Note : pada saat penulisan, versi drupal adalah versi 8.7.10, silahkan kunjungi halaman resmi drupal dan perbarui link download jika ada rilis yang lebih baru.
Setelah diunduh, ekstrak file yang diunduh dengan perintah berikut:
tar -xvzf drupal-8.7.10.tar.gz
Selanjutnya, pindahkan direktori yang diekstraksi ke direktori root web Nginx dengan perintah berikut:
mv drupal-8.7.10 /var/www/html/drupal
Selanjutnya, buat direktori untuk menyimpan file situs web dan ganti nama file default.settings.php seperti yang ditunjukkan di bawah ini:
mkdir /var/www/html/drupal/sites/default/files
 cp /var/www/html/drupal/sites/default/default.settings.php /var/www/html/drupal/sites/default/settings.php
Selanjutnya, ubah kepemilikan direktori Drupal ke nginx seperti yang ditunjukkan di bawah ini:
chown -R nginx:nginx /var/www/html/drupal/
Konfigurasikan Nginx untuk Drupal
Pertama, buat file konfigurasi php-fpm untuk Drupal dengan perintah berikut:
nano /etc/php-fpm.d/drupal.conf
tambahkan baris berikut
[drupal]
user = nginx
group = nginx
listen.owner = nginx
listen.group = nginx
listen = /run/php-fpm/drupal.sock
pm = ondemand
pm.max_children =  50
pm.process_idle_timeout = 10s
pm.max_requests = 500
chdir = /
Simpan dan tutup file setelah Anda selesai. Kemudian, buat file konfigurasi virtual host Nginx untuk Drupal:
nano /etc/nginx/conf.d/drupal.conf
Tambahkan baris berikut:
server {
    listen 80;
    server_name example.com;

    root /var/www/html/drupal;

    access_log /var/log/nginx/example.com.access.log;
    error_log /var/log/nginx/example.com.error.log;

    location = /favicon.ico {
        log_not_found off;
        access_log off;
    }

    location = /robots.txt {
        allow all;
        log_not_found off;
        access_log off;
    }

    location ~ \..*/.*\.php$ {
        return 403;
    }

    location ~ ^/sites/.*/private/ {
        return 403;
    }

    # Block access to scripts in site files directory
    location ~ ^/sites/[^/]+/files/.*\.php$ {
        deny all;
    }
    location ~ (^|/)\. {
        return 403;
    }

    location / {
        try_files $uri /index.php?$query_string;
    }

    location @rewrite {
        rewrite ^/(.*)$ /index.php?q=$1;
    }
    location ~ /vendor/.*\.php$ {
        deny all;
        return 404;
    }


    location ~ '\.php$|^/update.php' {
        fastcgi_split_path_info ^(.+?\.php)(|/.*)$;
        include fastcgi_params;
       	# Block httpoxy attacks. See https://httpoxy.org/.
        fastcgi_param HTTP_PROXY "";
        fastcgi_param SCRIPT_FILENAME $document_root$fastcgi_script_name;
        fastcgi_param PATH_INFO $fastcgi_path_info;
        fastcgi_param QUERY_STRING $query_string;
        fastcgi_intercept_errors on;
        fastcgi_pass unix:/run/php-fpm/drupal.sock;
    }
    location ~ ^/sites/.*/files/styles/ { # For Drupal >= 7
        try_files $uri @rewrite;
    }

    # Handle private files through Drupal. Private file's path can come
    # with a language prefix.
    location ~ ^(/[a-z\-]+)?/system/files/ { # For Drupal >= 7
        try_files $uri /index.php?$query_string;
    }

    location ~* \.(js|css|png|jpg|jpeg|gif|ico|svg)$ {
        try_files $uri @rewrite;
        expires max;
        log_not_found off;
    }
}
Simpan dan tutup file. Kemudian, restart layanan php-fpm dan Nginx untuk menerapkan perubahan:
systemctl restart php-fpm
 systemctl restart nginx
Konfigurasikan SELinux dan Firewall
Secara default, SELinux diaktifkan di CentOS 8. Jadi Anda perlu mengkonfigurasi SELinux agar Drupal berfungsi dengan benar.
Pertama, memungkinkan Drupal untuk memiliki hak akses write ke direktori file public dan private dengan perintah berikut:
semanage fcontext -a -t httpd_sys_rw_content_t "/var/www/html/drupal(/.*)?"
 semanage fcontext -a -t httpd_sys_rw_content_t '/var/www/html/drupal/sites/default/settings.php'
 semanage fcontext -a -t httpd_sys_rw_content_t '/var/www/html/drupal/sites/default/files'
 restorecon -Rv /var/www/html/drupal
 restorecon -v /var/www/html/drupal/sites/default/settings.php
 restorecon -Rv /var/www/html/drupal/sites/default/files
Selanjutnya, memungkinkan Drupal untuk mengirim email keluar dengan perintah berikut:
setsebool -P httpd_can_sendmail on
Selanjutnya, Anda harus membuat aturan firewall untuk mengizinkan layanan HTTP dan HTTPS dari jaringan eksternal. Anda dapat mengizinkannya dengan perintah berikut:
firewall-cmd --permanent --add-service=http
firewall-cmd --permanent --add-service=https
 firewall-cmd --reload
Secure Drupal dengan SSL Let’s Encrypt
Drupal sekarang diinstal dan dikonfigurasi. Saatnya untuk mengamankannya dengan SSL gratis Let’s Encrypt.
Untuk melakukannya, Anda harus mengunduh klien certbot di server. Anda dapat mengunduh dan mengatur izin yang benar dengan menjalankan perintah berikut:
wget https://dl.eff.org/certbot-auto
 mv certbot-auto /usr/local/bin/certbot-auto
 chown root /usr/local/bin/certbot-auto
 chmod 0755 /usr/local/bin/certbot-auto
Sekarang, jalankan perintah berikut untuk mendapatkan dan menginstal sertifikat SSL untuk situs web Drupal Anda.
certbot-auto --nginx -d example.com
Perintah di atas akan menginstal semua dependensi yang diperlukan ke server Anda. Setelah diinstal, Anda akan diminta untuk memberikan alamat email dan menerima ketentuan layanan seperti yang ditunjukkan di bawah ini:
Saving debug log to /var/log/letsencrypt/letsencrypt.log
Plugins selected: Authenticator apache, Installer apache
Enter email address (used for urgent renewal and security notices) (Enter 'c' to
cancel): [email protected]

- - - - - - - - - - - - - - - - - - - - - - - - - - - - - - - - - - - - - - - -
Please read the Terms of Service at
https://letsencrypt.org/documents/LE-SA-v1.2-November-15-2017.pdf. You must
agree in order to register with the ACME server at
https://acme-v02.api.letsencrypt.org/directory
- - - - - - - - - - - - - - - - - - - - - - - - - - - - - - - - - - - - - - - -
(A)gree/(C)ancel: A

- - - - - - - - - - - - - - - - - - - - - - - - - - - - - - - - - - - - - - - -
Would you be willing to share your email address with the Electronic Frontier
Foundation, a founding partner of the Let's Encrypt project and the non-profit
organization that develops Certbot? We'd like to send you email about our work
encrypting the web, EFF news, campaigns, and ways to support digital freedom.
- - - - - - - - - - - - - - - - - - - - - - - - - - - - - - - - - - - - - - - -
(Y)es/(N)o: Y


Obtaining a new certificate
Performing the following challenges:
http-01 challenge for example.com
Waiting for verification...
Cleaning up challenges
Deploying Certificate to VirtualHost /etc/nginx/conf.d/drupal.conf
Selanjutnya, Anda harus memilih untuk mengarahkan lalu lintas dari HTTP ke HTTPS atau tidak? seperti ditunjukkan di bawah ini:
Please choose whether or not to redirect HTTP traffic to HTTPS, removing HTTP access.
- - - - - - - - - - - - - - - - - - - - - - - - - - - - - - - - - - - - - - - -
1: No redirect - Make no further changes to the webserver configuration.
2: Redirect - Make all requests redirect to secure HTTPS access. Choose this for
new sites, or if you're confident your site works on HTTPS. You can undo this
change by editing your web server's configuration.
- - - - - - - - - - - - - - - - - - - - - - - - - - - - - - - - - - - - - - - -
Select the appropriate number [1-2] then [enter] (press 'c' to cancel): 2
Ketik 2 dan tekan Enter untuk melanjutkan. Setelah instalasi selesai, Anda akan melihat output berikut:
Redirecting all traffic on port 80 to ssl in /etc/nginx/conf.d/drupal.conf

- - - - - - - - - - - - - - - - - - - - - - - - - - - - - - - - - - - - - - - -
Congratulations! You have successfully enabled https://example.com

You should test your configuration at:
https://www.ssllabs.com/ssltest/analyze.html?d=example.com
- - - - - - - - - - - - - - - - - - - - - - - - - - - - - - - - - - - - - - - -

IMPORTANT NOTES:
 - Congratulations! Your certificate and chain have been saved at:
   /etc/letsencrypt/live/example.com/fullchain.pem
   Your key file has been saved at:
   /etc/letsencrypt/live/example.com/privkey.pem
   Your cert will expire on 2020-03-23. To obtain a new or tweaked
   version of this certificate in the future, simply run certbot-auto
   again with the "certonly" option. To non-interactively renew *all*
   of your certificates, run "certbot-auto renew"
 - If you like Certbot, please consider supporting our work by:

   Donating to ISRG / Let's Encrypt:   https://letsencrypt.org/donate
   Donating to EFF:         https://eff.org/donate-le
Akses Situs Web Drupal
Sekarang, buka browser web dan ketik URL website drupal Anda, maka akan diarahkan ke halaman berikut:
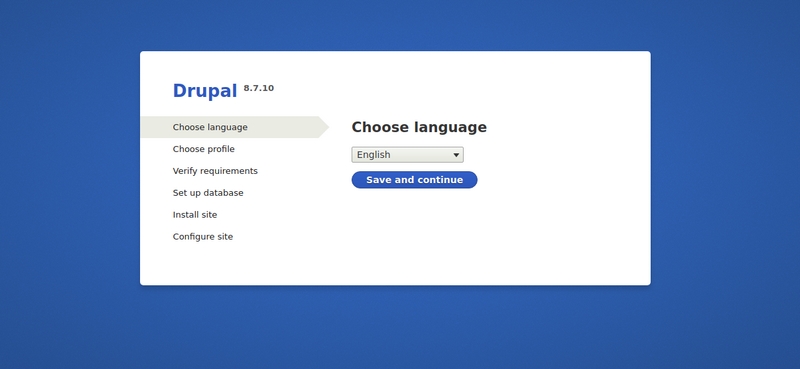
Pilih bahasa yang Anda inginkan dan klik tombol Save and continue. Anda akan melihat halaman berikut:
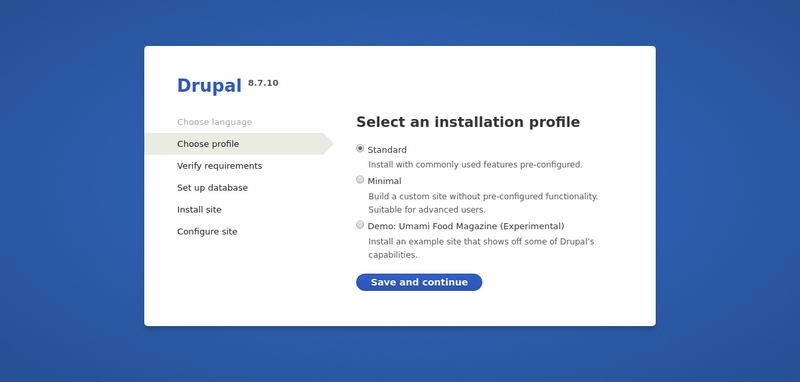
Pilih profil instalasi Anda dan klik tombol Save and continue. Anda akan melihat halaman berikut:

Berikan detail basis data Anda dan klik tombol Save and continue. Anda akan melihat halaman berikut:
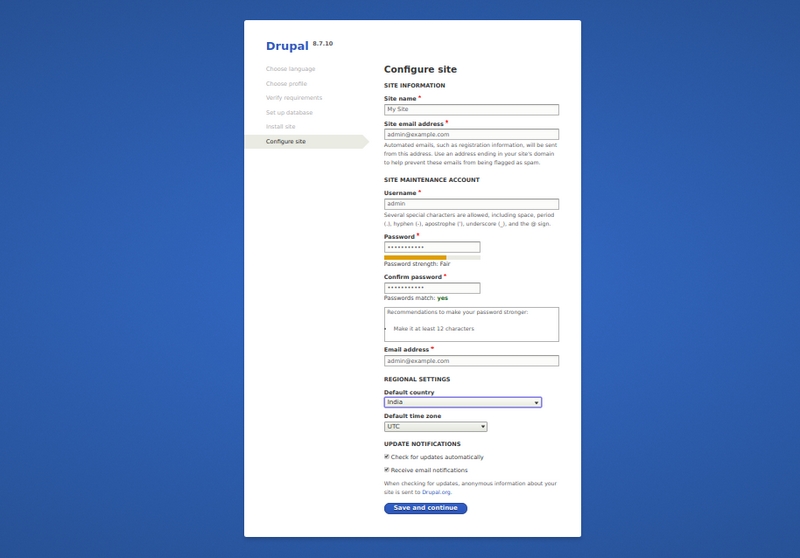
Berikan nama situs Anda, nama pengguna admin, kata sandi dan klik tombol Save and continue. Anda akan melihat dasboard Drupal Anda di halaman berikut:
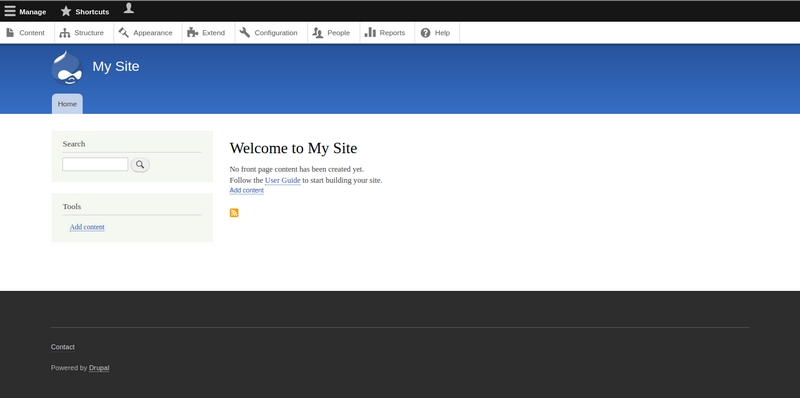
Selamat! Anda telah berhasil menginstal dan mengamankan Drupal di server CentOS 8.