ElkArte adalah perangkat lunak free, open-source dan cukup powerful yang memungkinkan Anda membuat komunitas forum online sendiri.
ElkArte adalah platform forum sederhana, ringan dan modern berbasis PHP dan menggunakan MySQL / MariaDB untuk menyimpan datanya. ElkArte hadir dengan beragam fitur termasuk, Notifikasi, fitur like pada postingan, Drafts, Auto save, Drag and drop lampiran file, video embedding youtube, Posting melalui Email, Anti Spam, dan banyak lagi.
Dalam tutorial ini, kami akan menjelaskan cara menginstal ElkArte di server Debian 10.
Prasyarat
- Sistem yang menjalankan sistem Debian 10.
- Masuk sebagai user non-root dengan hak sudo.
Sebelum Mulai
Perbarui paket sistem operasi Anda (software). Ini adalah langkah pertama yang penting karena memastikan Anda memiliki pembaruan terbaru dan perbaikan keamanan untuk paket perangkat lunak default sistem operasi Anda:
sudo apt update && sudo apt upgrade -y
Install Apache, MariaDB dan PHP
Pertama, Anda perlu menginstal web server Apache, MariaDB, PHP, dan library lain yang diperlukan ke server. Anda dapat menginstal semuanya dengan menjalankan perintah berikut:
sudo su
apt-get install apache2 mariadb-server php libapache2-mod-php php-common php-curl php-intl php-mbstring php-xmlrpc php-mysql php-gd php-pgsql php-xml php-cli php-imagick php-bcmath php-gmp php-zip unzip -y
Setelah semua paket diinstal, buka file php.ini dan atur beberapa pengaturan:
sudo nano /etc/php/7.3/apache2/php.ini
Ubah baris berikut:
memory_limit = 256M
upload_max_filesize = 100M
max_execution_time = 360
date.timezone = Asia/Jakarta
Untuk pengaturan zona waktu server, dalam contoh ini kita mengatur pada Asia/Jakarta. Untuk melihat list zona waktu lain kunjungi artikel ini.
Simpan dan tutup file setelah Anda selesai. Kemudian, restart web server Apache dengan perintah berikut:
systemctl restart apache2
Konfigurasikan Database untuk ElkArte
Selanjutnya, Anda harus membuat database dan user untuk ElkArte. Untuk melakukannya, masuk ke shell MariaDB dengan perintah berikut:
mysql -u root -p
Masukkan kata sandi root Anda saat diminta. Kemudian, buat database dan user database untuk ElkArte. Dalam contoh berikut, kita akan membuat database dengan nama elkartedb dan dengan nama user elkarte
MariaDB [(none)]> CREATE DATABASE elkartedb;
 MariaDB [(none)]> CREATE USER 'elkarte'@'localhost' IDENTIFIED BY 'G4nt1_D3n9an_Pa$$w0rd';
Selanjutnya, berikan semua hak istimewa ke ElkArte dengan perintah berikut:
MariaDB [(none)]> GRANT ALL ON elkartedb.* TO 'elkarte'@'localhost' WITH GRANT OPTION;
Selanjutnya, flush privilege dan keluar dari shell MariaDB dengan perintah berikut:
MariaDB [(none)]> FLUSH PRIVILEGES;
 MariaDB [(none)]> EXIT;
Setelah selesai, Anda dapat melanjutkan ke langkah berikutnya.
Download ElkArte
Pertama, Anda harus download versi terbaru ElkArte dari repositori Git. Untuk download, jalankan perintah wget berikut:
wget https://github.com/elkarte/Elkarte/archive/master.zip
Setelah unduhan selesai, buka unzip file yang diunduh dengan perintah berikut:
unzip master.zip
Selanjutnya, pindahkan direktori yang diekstrak ke direktori root web Apache:
sudo mv Elkarte-master /var/www/elkarte
Selanjutnya, ubah kepemilikan direktori elkarte dan berikan izin yang diperlukan dengan perintah berikut:
sudo chown -R www-data:www-data /var/www/elkarte
sudo chmod -R 755 /var/www/html/elkarte
Setelah selesai, Anda dapat melanjutkan ke langkah berikutnya.
Buat Virtual Host untuk ElkArte
Selanjutnya, Anda perlu membuat file konfigurasi virtual host Apache untuk melayani ElkArte. Anda dapat membuatnya dengan perintah berikut:
nano /etc/apache2/sites-available/elkarte.conf
Tambahkan baris berikut:
<VirtualHost *:80>
     ServerAdmin [email protected]
     DocumentRoot /var/www/html/elkarte
     ServerName example.com

     <Directory /var/www/html/elkarte/>
          Options FollowSymlinks
          AllowOverride All
          Require all granted
     </Directory>

     ErrorLog ${APACHE_LOG_DIR}/error.log
     CustomLog ${APACHE_LOG_DIR}/access.log combined

</VirtualHost>
Simpan dan tutup file setelah Anda selesai. Kemudian aktifkan file virtual host dan modul Apache rewrite dengan perintah berikut:
a2ensite elkarte.conf
 a2enmod rewrite
Terakhir, restart web server Apache untuk menerapkan perubahan:
systemctl restart apache2
Akses Antarmuka Web ElkArte
ElkArte sekarang diinstal dan dikonfigurasi. Saatnya untuk mengakses antarmuka web ElkArte.
Buka web browser dan ketik URL domain Anda, maka Anda akan diarahkan ke halaman selamat datang ElkArte:
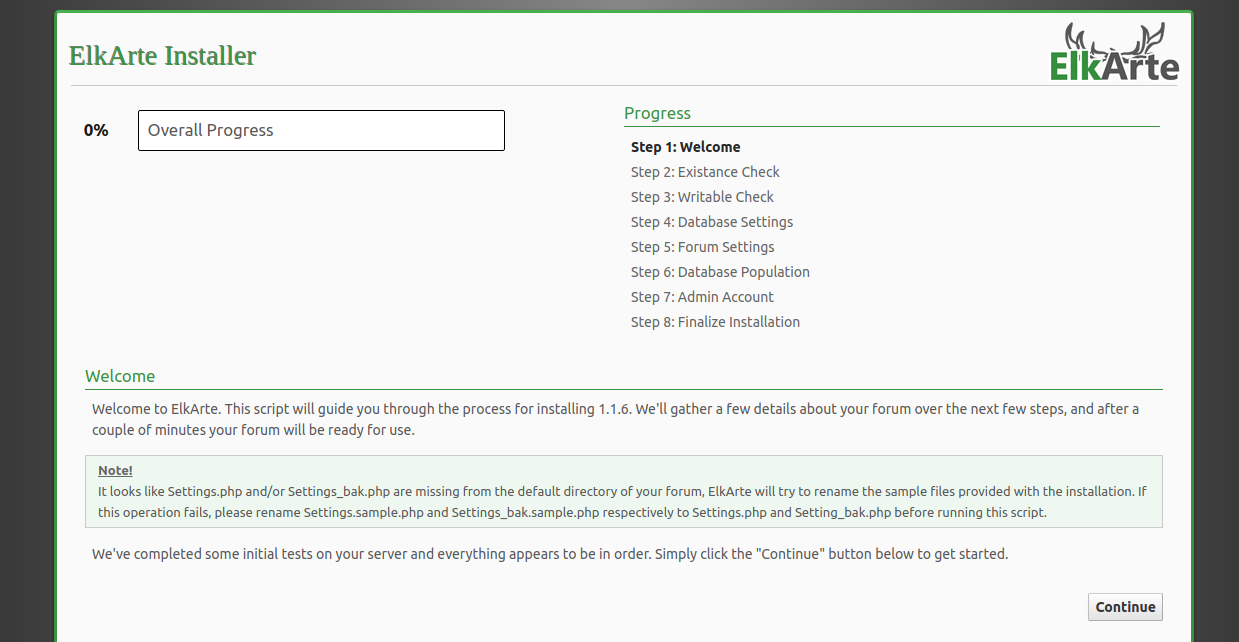
Klik pada tombol Continue. Anda akan melihat halaman berikut:
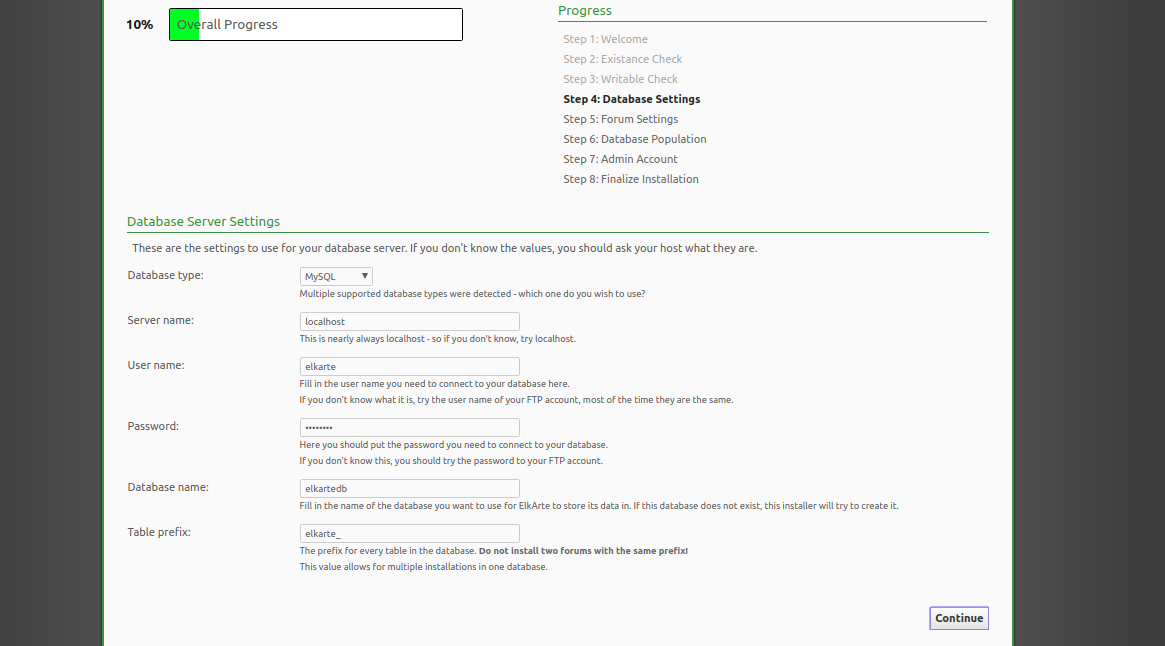
Berikan nama database , nama pengguna database, kata sandi, dan klik tombol Continue. Anda akan melihat halaman berikut:
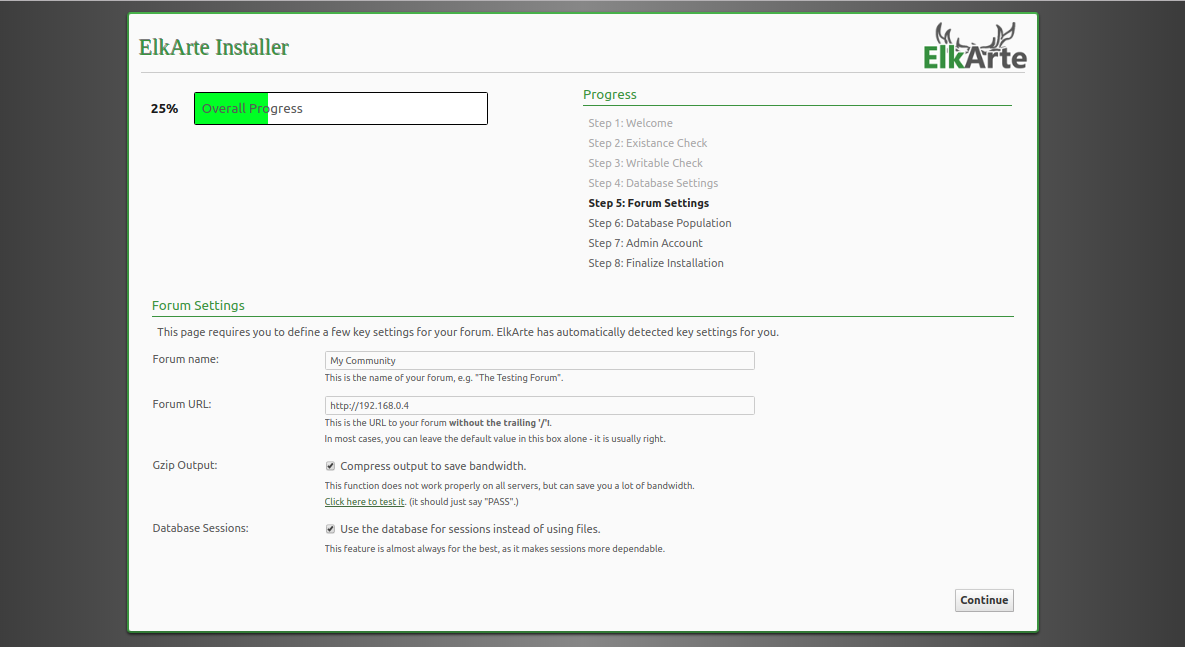
Berikan nama Forum Anda, URL Forum dan klik tombol Continue. Anda akan melihat halaman berikut:
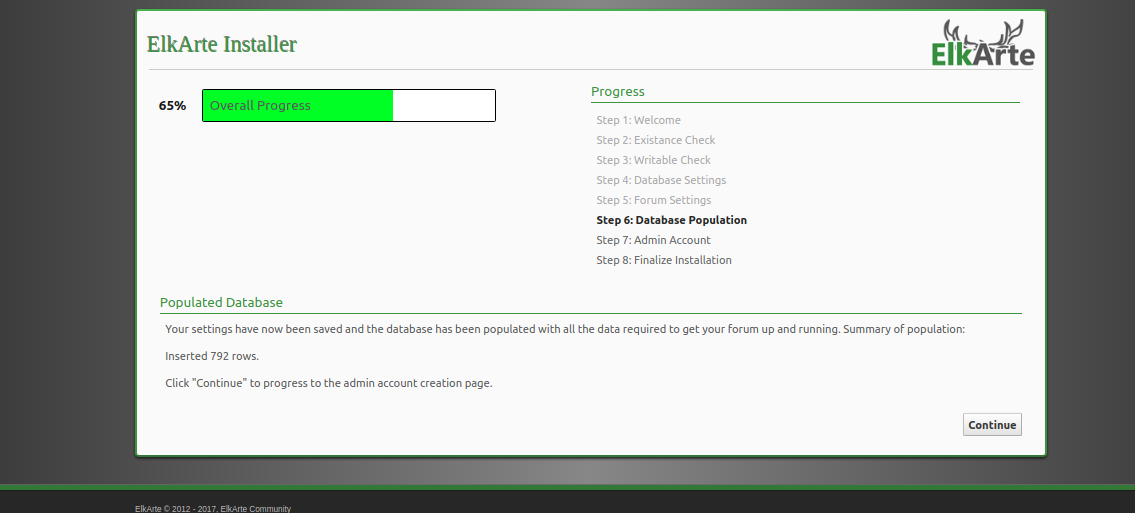
Sekarang, klik tombol Continue. Anda akan melihat halaman pembuatan user admin:
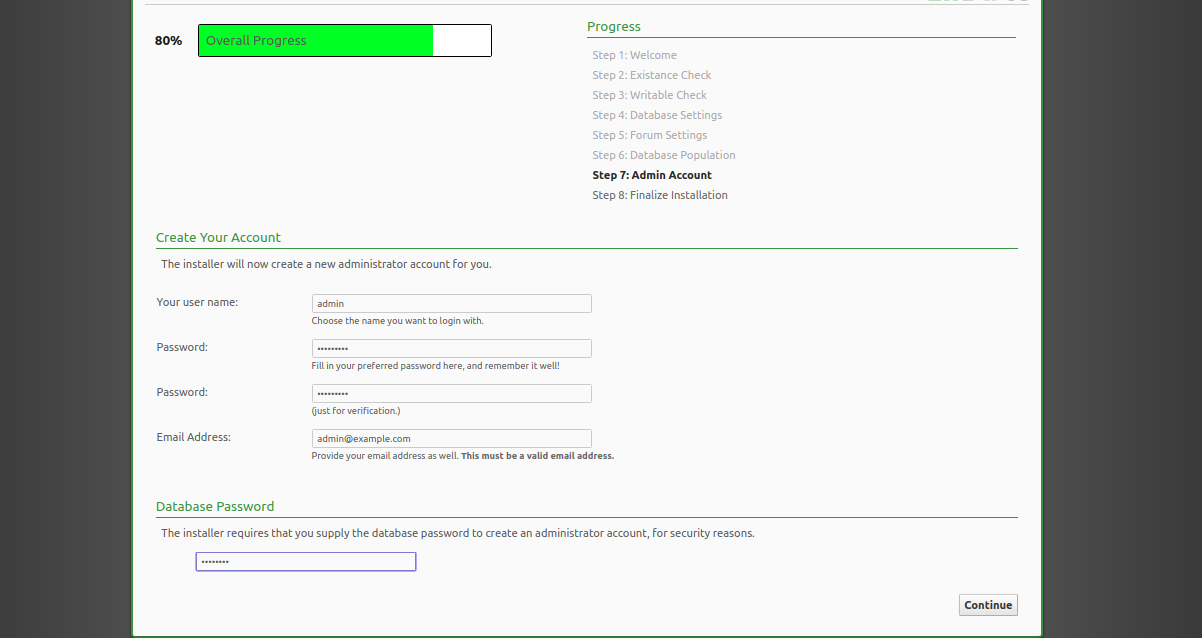
Berikan nama administrator, kata sandi, email, kata sandi database yang Anda inginkan dan klik tombol Continue. Setelah instalasi selesai, Anda akan melihat halaman berikut:
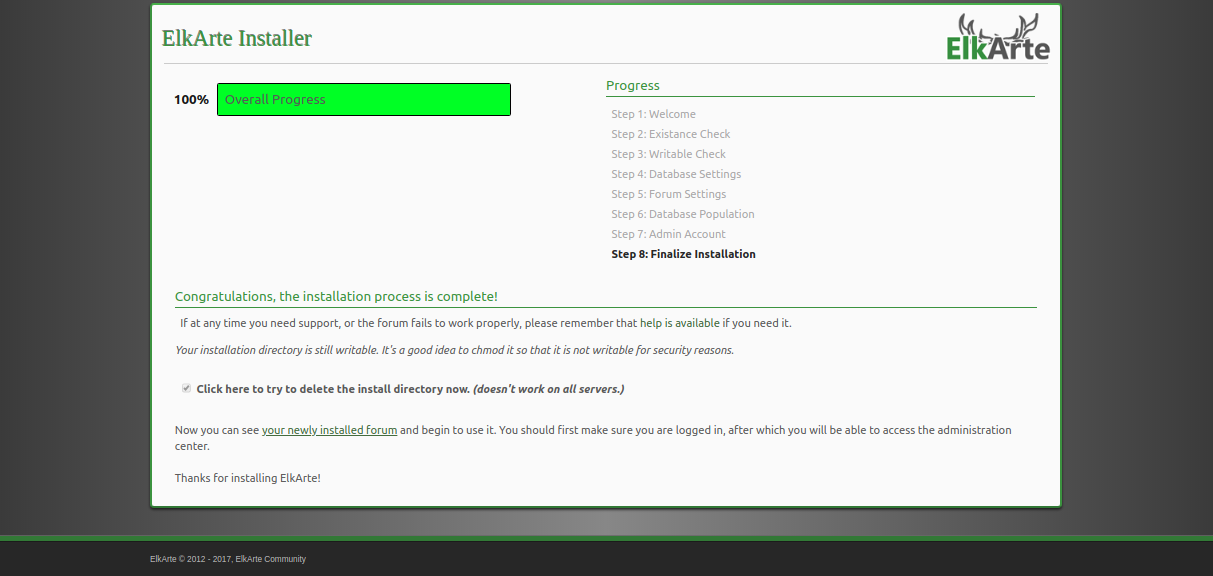
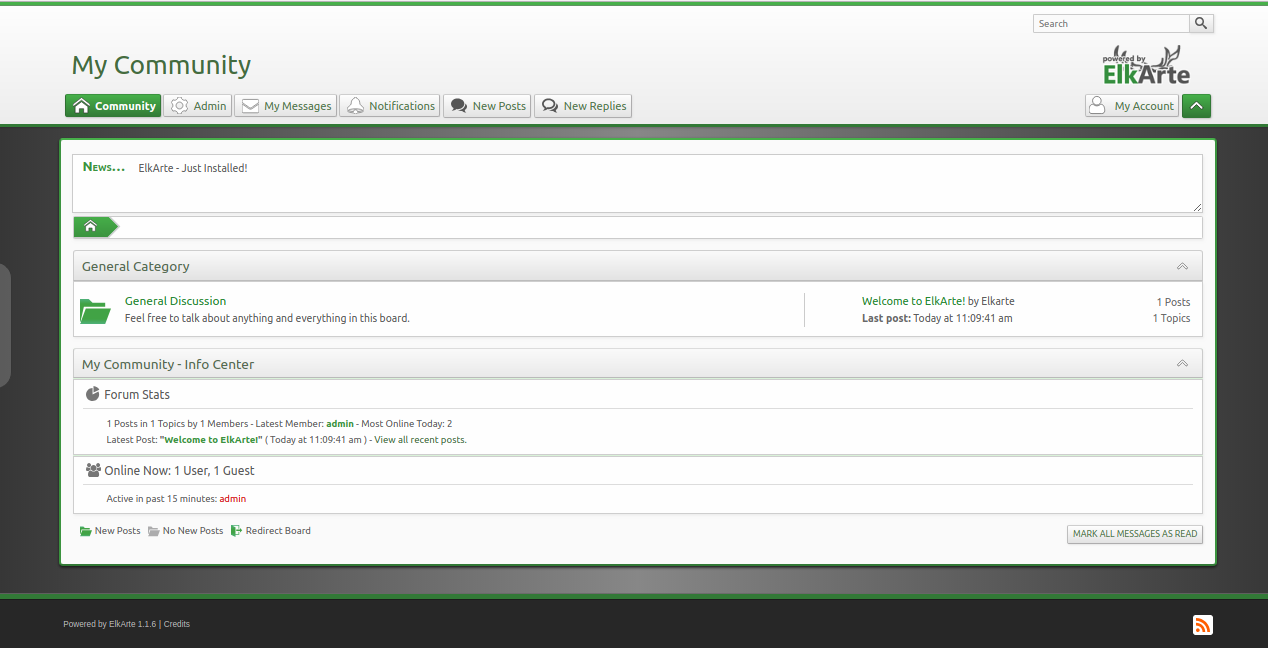
Sekarang, klik pada “your newly installed forum“. Anda akan melihat dasbor ElkArte di halaman berikut:
Amankan ElkArte dengan Let’s Encrypt
Pertama, Anda harus menginstal Certbot di server. Certbot digunakan untuk mendapatkan sertifikat SSL dari Let’s Encrypt dan konfigurasikan Apache untuk menggunakan sertifikat ini.
Secara default, versi terbaru Certbot tidak tersedia di repositori default Debian 10. Jadi, Anda perlu menambahkan repositori Certbot di server Anda.
Pertama, tambahkan repositori Certbot dengan perintah berikut:
add-apt-repository ppa:certbot/certbot
Setelah repositori ditambahkan, perbarui repositori dan instal Certbot dengan perintah berikut:
apt-get update -y
 apt-get install certbot python-certbot-apache -y
Certbot sekarang diinstal dan siap digunakan.
Jalankan perintah berikut untuk mendapatkan sertifikat SSL untuk domain Anda:
certbot --apache -d example.com
Pertama, Anda harus memberikan alamat email yang valid dan menyetujui persyaratan layanan seperti yang ditunjukkan di bawah ini:
Saving debug log to /var/log/letsencrypt/letsencrypt.log
Plugins selected: Authenticator apache, Installer apache
Enter email address (used for urgent renewal and security notices) (Enter 'c' to
cancel): [email protected]

- - - - - - - - - - - - - - - - - - - - - - - - - - - - - - - - - - - - - - - -
Please read the Terms of Service at
https://letsencrypt.org/documents/LE-SA-v1.2-November-15-2017.pdf. You must
agree in order to register with the ACME server at
https://acme-v02.api.letsencrypt.org/directory
- - - - - - - - - - - - - - - - - - - - - - - - - - - - - - - - - - - - - - - -
(A)gree/(C)ancel: A

- - - - - - - - - - - - - - - - - - - - - - - - - - - - - - - - - - - - - - - -
Would you be willing to share your email address with the Electronic Frontier
Foundation, a founding partner of the Let's Encrypt project and the non-profit
organization that develops Certbot? We'd like to send you email about our work
encrypting the web, EFF news, campaigns, and ways to support digital freedom.

- - - - - - - - - - - - - - - - - - - - - - - - - - - - - - - - - - - - - - - -
(Y)es/(N)o: Y
Obtaining a new certificate
Performing the following challenges:
http-01 challenge for example.com
Enabled Apache rewrite module
Waiting for verification...
Cleaning up challenges
Created an SSL vhost at /etc/apache2/sites-available/example.com-le-ssl.conf
Deploying Certificate to VirtualHost /etc/apache2/sites-available/example.com-le-ssl.conf
Enabling available site: /etc/apache2/sites-available/example.com-le-ssl.conf

Please choose whether or not to redirect HTTP traffic to HTTPS, removing HTTP access.
- - - - - - - - - - - - - - - - - - - - - - - - - - - - - - - - - - - - - - - -
1: No redirect - Make no further changes to the webserver configuration.
2: Redirect - Make all requests redirect to secure HTTPS access. Choose this for
new sites, or if you're confident your site works on HTTPS. You can undo this
change by editing your web server's configuration.
- - - - - - - - - - - - - - - - - - - - - - - - - - - - - - - - - - - - - - - -
Select the appropriate number [1-2] then [enter] (press 'c' to cancel): 2
Selanjutnya, pilih opsi 2 untuk download dan install sertifikat SSL gratis untuk domain Anda. Setelah instalasi selesai dengan sukses. Anda harus mendapatkan output berikut:
Enabled Apache rewrite module
Redirecting vhost in /etc/apache2/sites-enabled/example.com.conf to ssl vhost in /etc/apache2/sites-available/
example.com-le-ssl.conf

- - - - - - - - - - - - - - - - - - - - - - - - - - - - - - - - - - - - - - - -
Congratulations! You have successfully enabled https://example.com

You should test your configuration at:
https://www.ssllabs.com/ssltest/analyze.html?d=example.com
- - - - - - - - - - - - - - - - - - - - - - - - - - - - - - - - - - - - - - - -

IMPORTANT NOTES:
 - Congratulations! Your certificate and chain have been saved at:
   /etc/letsencrypt/live/example.com/fullchain.pem
   Your key file has been saved at:
   /etc/letsencrypt/live/example.com/privkey.pem
   Your cert will expire on 2019-10-22. To obtain a new or tweaked
   version of this certificate in the future, simply run certbot again
   with the "certonly" option. To non-interactively renew *all* of
   your certificates, run "certbot renew"
 - Your account credentials have been saved in your Certbot
   configuration directory at /etc/letsencrypt. You should make a
   secure backup of this folder now. This configuration directory will
   also contain certificates and private keys obtained by Certbot so
   making regular backups of this folder is ideal.
 - If you like Certbot, please consider supporting our work by:
   Donating to ISRG / Let's Encrypt:   https://letsencrypt.org/donate
   Donating to EFF:         https://eff.org/donate-le
Selamat! ElkArte Anda sekarang diamankan dengan sertifikat SSL. Anda sekarang dapat mengaksesnya dengan aman dengan mengunjungi URL https://example.com.