WonderCMS adalah sistem manajemen konten (CMS) free, open-source, sederhana dan ringan untuk membangun situs web dan blog sederhana. CMS Ini termasuk dalam kategori flat-file CMS yang mana tidak memerlukan database apa pun.
Proses instalasi sangat sederhana dan tidak memerlukan konfigurasi awal. Ini menawarkan serangkaian fitur termasuk, dukungan WYSIWYG, CSS framework yang fleksibel, SEO friendly dan banyak lagi.
Dalam tutorial ini, kami akan menunjukkan kepada Anda bagaimana menginstal WonderCMS pada CentOS 8 dan mengamankannya dengan Let’s Encrypt SSL.
Prasyarat
Install Apache dan PHP
Pertama, install Apache webserver, PHP, dan ekstensi PHP lainnya dengan perintah berikut:
sudo dnf install httpd php php-mysqlnd php-curl php-opcache php-xml php-xmlrpc php-gd php-mbstring php-zip php-json wget unzip git -y
Setelah instalasi selesai, buka file php.ini dan ubah beberapa pengaturan:
sudo nano /etc/php.ini
Ubah nilai sesuai kebutuhan Anda:
memory_limit = 128M
post_max_size = 32M
upload_max_filesize = 16M
max_execution_time = 300
date.timezone = Asia/Jakarta
Simpan dan tutup file setelah Anda selesai. Kemudian, start Apache dan aktifkan untuk memulai setelah sistem reboot dengan perintah berikut:
systemctl start httpd
 systemctl enable httpd
Download WonderCMS
Pertama, download versi terbaru WonderCMS dari repositori Git:
cd /var/www/html
 git clone https://github.com/robiso/wondercms.git
Setelah download selesai, berikan izin dan kepemilikan yang sesuai ke direktori yang diunduh dengan perintah berikut:
chown -R apache:apache /var/www/html/wondercms
 chmod -R 775 /var/www/html/wondercms
Konfigurasikan Apache untuk WonderCMS
Pertama, buat file konfigurasi virtual host Apache baru untuk WonderCMS dengan perintah berikut:
sudo nano /etc/httpd/conf.d/wondercms.conf
Tambahkan baris berikut:
<VirtualHost *:80>
  ServerName namadomain.com
  DirectoryIndex index.php
  DocumentRoot /var/www/html/wondercms
  Redirect /wondercms/loginURL /loginURL

  ErrorLog /var/log/httpd/namadomain.com-error.log
  CustomLog /var/log/httpd/namadomain.com-access.log combined

  <Directory /var/www/html/wondercms>
      Options FollowSymLinks
      AllowOverride All
      Require all granted
  </Directory>

</VirtualHost>
Simpan dan tutup file. Kemudian, restart Apache dengan perintah berikut:
systemctl restart httpd
Anda juga dapat memeriksa status layanan Apache dengan perintah berikut:
systemctl status httpd
Anda akan melihat output berikut:
? httpd.service - The Apache HTTP Server
   Loaded: loaded (/usr/lib/systemd/system/httpd.service; disabled; vendor preset: disabled)
  Drop-In: /usr/lib/systemd/system/httpd.service.d
??php-fpm.conf
   Active: active (running) since Wed 2020-02-19 08:51:34 UTC; 1min 25s ago
     Docs: man:httpd.service(8)
 Main PID: 4716 (httpd)
   Status: "Total requests: 6; Idle/Busy workers 100/0;Requests/sec: 0.0759; Bytes served/sec: 812 B/sec"
    Tasks: 278 (limit: 12558)
   Memory: 43.1M
   CGroup: /system.slice/httpd.service
??4716 /usr/sbin/httpd -DFOREGROUND
??4718 /usr/sbin/httpd -DFOREGROUND
??4719 /usr/sbin/httpd -DFOREGROUND
??4720 /usr/sbin/httpd -DFOREGROUND
??4721 /usr/sbin/httpd -DFOREGROUND
??4935 /usr/sbin/httpd -DFOREGROUND

Feb 19 08:51:34 centos8 systemd[1]: Starting The Apache HTTP Server...
Amankan WonderCMS dengan SSL Let’s Encrypt
Selanjutnya, install Certbot client untuk installasi Let’s Encrypt dengan perintah berikut:
wget https://dl.eff.org/certbot-auto
 mv certbot-auto /usr/local/bin/certbot-auto
 chown root /usr/local/bin/certbot-auto
 chmod 0755 /usr/local/bin/certbot-auto
Sekarang, jalankan perintah berikut untuk mendapatkan dan menginstal sertifikat SSL untuk situs web WonderCMS Anda.
certbot-auto --apache -d namadomain.com
Perintah di atas pertama-tama akan menginstal semua dependensi yang diperlukan di server Anda. Setelah diinstal, Anda akan diminta untuk memberikan alamat email dan menerima ketentuan layanan seperti yang ditunjukkan di bawah ini:
Note : Jika Anda akan mendapatkan error terkait sertifikat SSL, restart layanan Apache dan jalankan kembali perintah di atas.
Saving debug log to /var/log/letsencrypt/letsencrypt.log
Plugins selected: Authenticator apache, Installer apache
Enter email address (used for urgent renewal and security notices) (Enter 'c' to
cancel): [email protected]

- - - - - - - - - - - - - - - - - - - - - - - - - - - - - - - - - - - - - - - -
Please read the Terms of Service at
https://letsencrypt.org/documents/LE-SA-v1.2-November-15-2017.pdf. You must
agree in order to register with the ACME server at
https://acme-v02.api.letsencrypt.org/directory
- - - - - - - - - - - - - - - - - - - - - - - - - - - - - - - - - - - - - - - -
(A)gree/(C)ancel: A

- - - - - - - - - - - - - - - - - - - - - - - - - - - - - - - - - - - - - - - -
Would you be willing to share your email address with the Electronic Frontier
Foundation, a founding partner of the Let's Encrypt project and the non-profit
organization that develops Certbot? We'd like to send you email about our work
encrypting the web, EFF news, campaigns, and ways to support digital freedom.
- - - - - - - - - - - - - - - - - - - - - - - - - - - - - - - - - - - - - - - -
(Y)es/(N)o: Y


Obtaining a new certificate
Performing the following challenges:
http-01 challenge for linuxid.net
Waiting for verification...
Cleaning up challenges
Deploying Certificate to VirtualHost /etc/nginx/conf.d/wondercms.conf
Selanjutnya, Anda harus memilih untuk mengarahkan lalu lintas HTTP ke HTTPS seperti ditunjukkan di bawah ini:
Please choose whether or not to redirect HTTP traffic to HTTPS, removing HTTP access.
- - - - - - - - - - - - - - - - - - - - - - - - - - - - - - - - - - - - - - - -
1: No redirect - Make no further changes to the webserver configuration.
2: Redirect - Make all requests redirect to secure HTTPS access. Choose this for
new sites, or if you're confident your site works on HTTPS. You can undo this
change by editing your web server's configuration.
- - - - - - - - - - - - - - - - - - - - - - - - - - - - - - - - - - - - - - - -
Select the appropriate number [1-2] then [enter] (press 'c' to cancel): 2
Ketik 2 dan tekan Enter untuk melanjutkan. Setelah instalasi selesai, Anda akan melihat output berikut:
Redirecting all traffic on port 80 to ssl in /etc/nginx/conf.d/wondercms.conf

- - - - - - - - - - - - - - - - - - - - - - - - - - - - - - - - - - - - - - - -
Congratulations! You have successfully enabled https://linuxid.net

You should test your configuration at:
https://www.ssllabs.com/ssltest/analyze.html?d=linuxid.net
- - - - - - - - - - - - - - - - - - - - - - - - - - - - - - - - - - - - - - - -

IMPORTANT NOTES:
 - Congratulations! Your certificate and chain have been saved at:
   /etc/letsencrypt/live/linuxid.net/fullchain.pem
   Your key file has been saved at:
   /etc/letsencrypt/live/linuxid.net/privkey.pem
   Your cert will expire on 2020-03-23. To obtain a new or tweaked
   version of this certificate in the future, simply run certbot-auto
   again with the "certonly" option. To non-interactively renew *all*
   of your certificates, run "certbot-auto renew"
 - If you like Certbot, please consider supporting our work by:

   Donating to ISRG / Let's Encrypt:   https://letsencrypt.org/donate
   Donating to EFF:         https://eff.org/donate-le
Konfigurasikan Firewall dan SELinux
Selanjutnya, Anda harus membuat rule firewall untuk mengizinkan layanan HTTP dan HTTPS dari jaringan eksternal. Anda dapat mengizinkannya dengan perintah berikut:
firewall-cmd --permanent --add-service=http
firewall-cmd --permanent --add-service=https
firewall-cmd --reload
Selanjutnya, Anda harus mengkonfigurasi SELinux untuk WonderCMS. Anda dapat mengkonfigurasi SELinux menggunakan perintah berikut:
setsebool httpd_can_network_connect on -P
 chcon -R -u system_u -t httpd_sys_rw_content_t -r object_r /var/www/html/wondercms
Terakhir, restart layanan Apache untuk menerapkan perubahan:
systemctl restart httpd
Akses WonderCMS
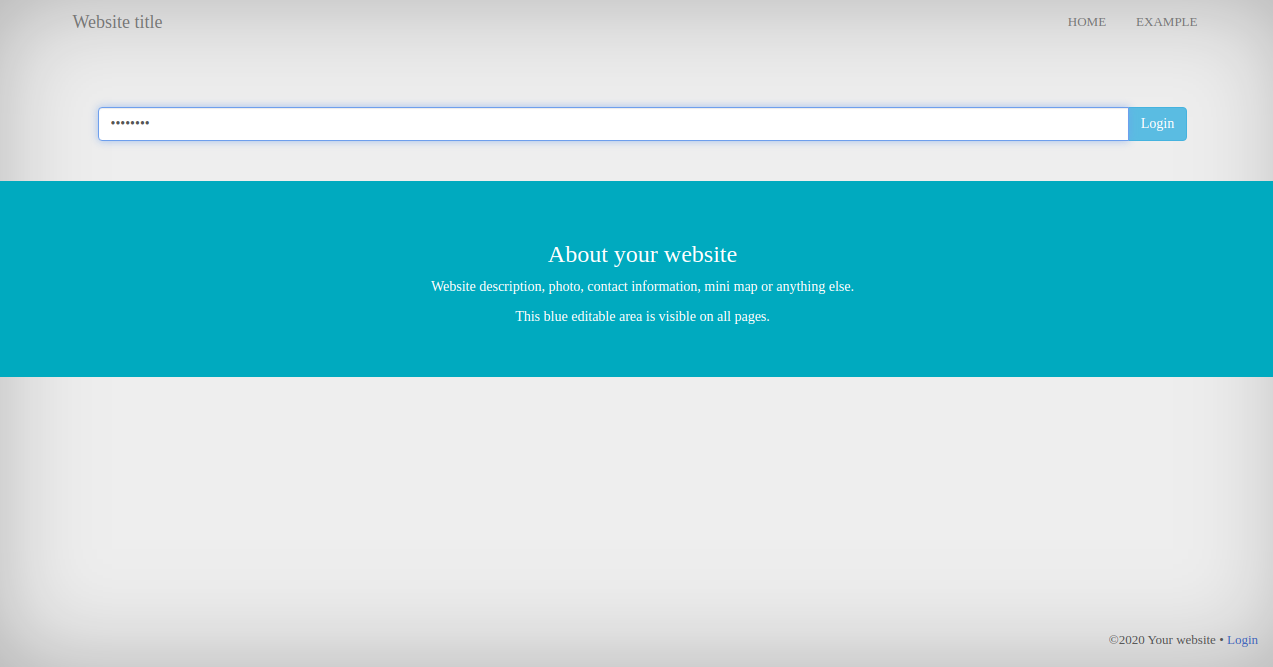
Sekarang, buka browser web dan ketik URL https://domainanda.com. Anda akan diarahkan ke beranda WonderCMS:
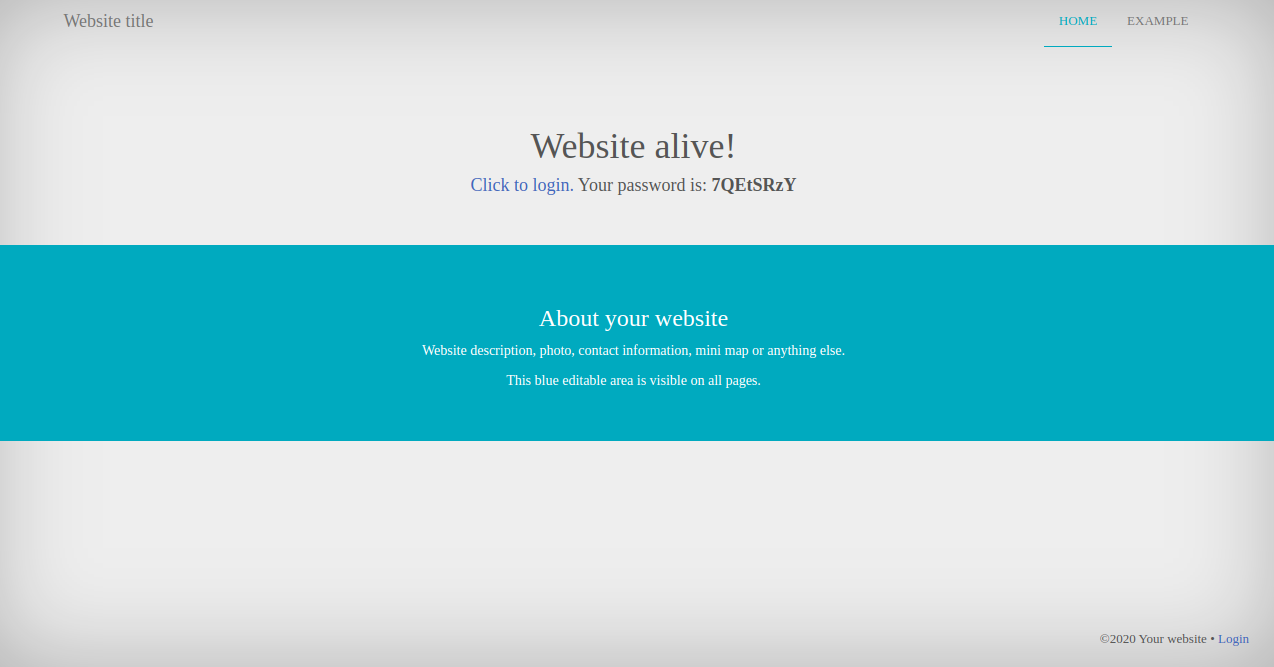
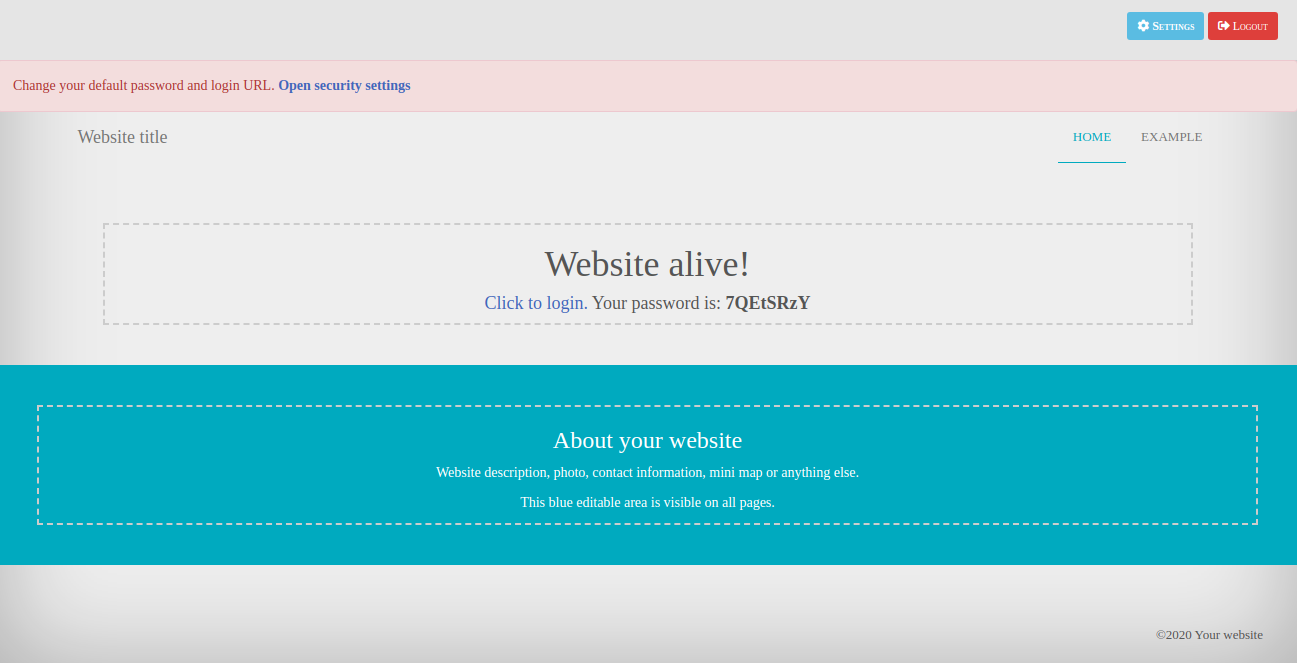
Sekarang, copy kata sandi dari halaman di atas dan klik tombol Click to login. Anda akan melihat halaman berikut:
Paste kata sandi dan klik tombol Login. Anda akan melihat halaman berikut:
Selanjutnya, klik pada Settings => Security. Anda akan melihat halaman berikut:
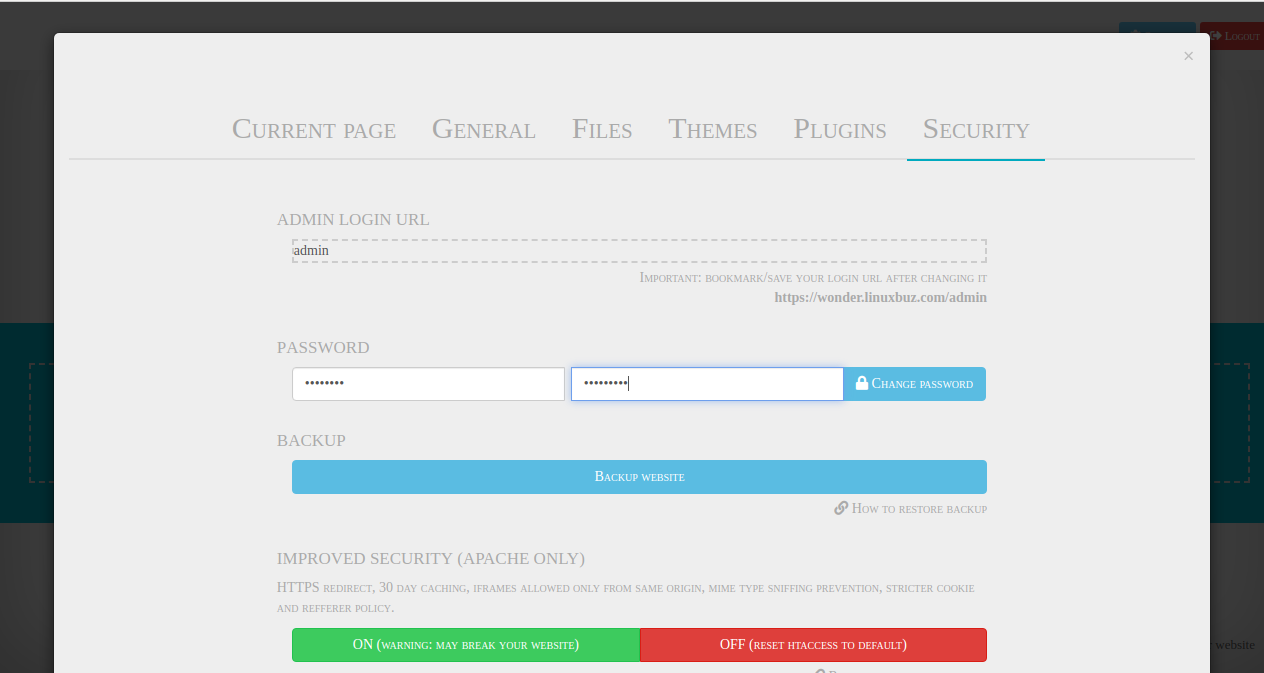
Ubah URL login, kata sandi Anda dan klik tombol CHANGE PASSWORD.
Kesimpulan
Selamat! Anda telah berhasil menginstal dan mengamankan WonderCMS pada CentOS 8 dengan SSL Let’s Encrypt. Sekarang Anda dapat meng-host blog dan situs web Anda dengan mudah menggunakan WonderCMS.